
Let’s be completely real: walking into a dark, outdated, builder-grade kitchen every single morning is incredibly frustrating. You spend a huge portion of your life in this room, yet staring at yellowing oak cabinets, peeling laminate countertops, and a dingy backsplash makes cooking feel like a chore rather than a joy. You scroll through beautiful home makeovers online and think, “I just don’t have $20,000 for a massive gut renovation.”
Take a deep breath. You do not need to rip out your cabinets or knock down load-bearing walls to completely change the vibe of your home.
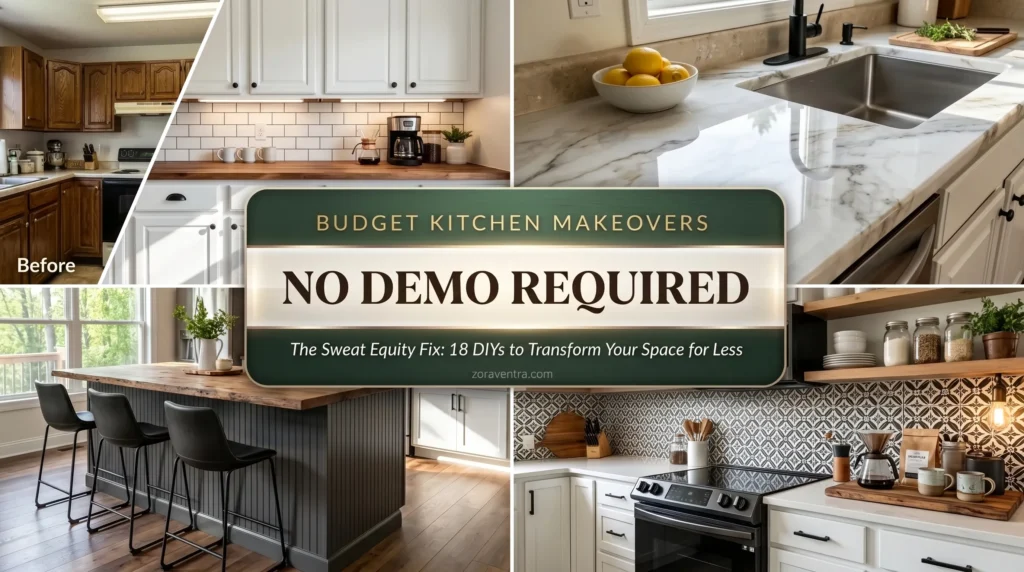
The secret to a jaw-dropping cheap kitchen makeover before and after is the power of “sweat equity.” With a little elbow grease, some high-quality paint, and a few clever lo-fi hacks, you can execute a stunning “no-demo” transformation. If you are wondering how to update an old kitchen on a budget, I am about to show you. Here are 18 high-impact kitchen renovation ideas before and after on a tight budget that will turn your frustrating cooking space into a modern sanctuary.
Transform the Cabinets (No Demolition Required)
1. DIY Kitchen Cabinet Painting Before and After
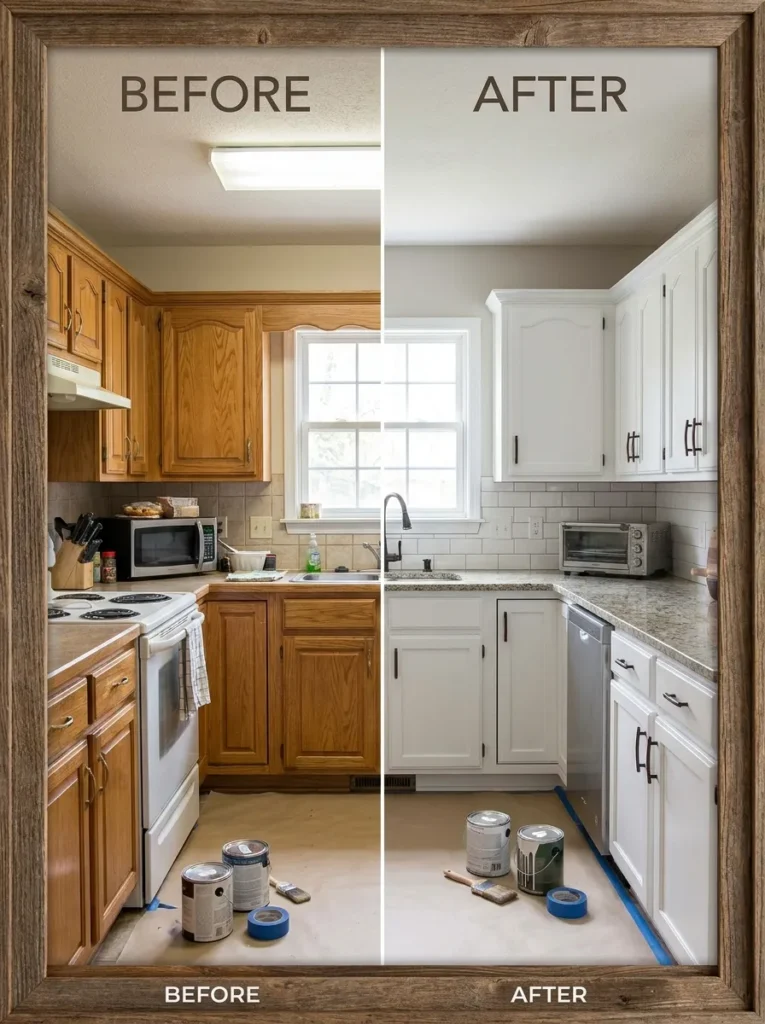
The biggest light-sucker in an old kitchen is dark, heavy wood. Executing a diy kitchen cabinet painting before and after project is the highest-ROI weekend job you can do. By thoroughly degreasing, priming, and painting your 90s oak cabinets a crisp, warm white, you instantly modernize the room.
2. The Two-Tone Cabinet Trend
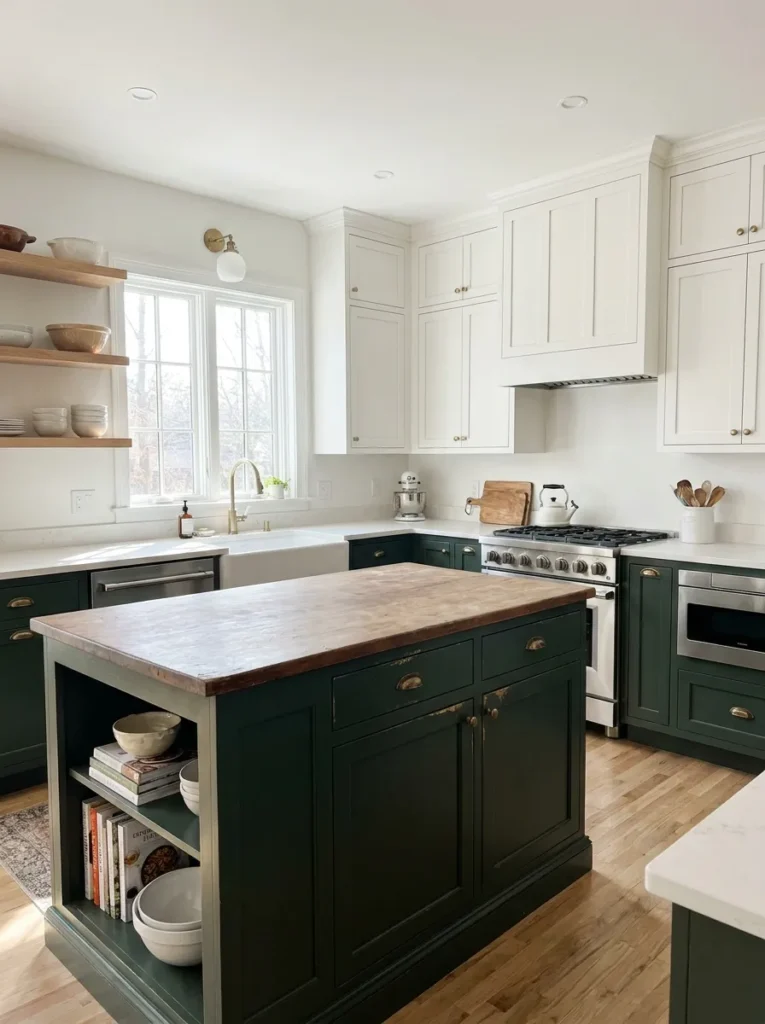
If an all-white kitchen feels too sterile, do a two-tone budget kitchen remodel without replacing cabinets. Paint your upper cabinets white to bounce the light around, but paint your lower cabinets a grounding color like deep forest green or slate blue. It hides scuff marks and adds a highly custom, designer feel.
3. Add Crown Molding for Custom Height
Builder-grade cabinets usually stop a foot below the ceiling, creating an awkward gap. For low cost kitchen remodel ideas, buy inexpensive MDF crown molding and nail it to the top edge of your cabinets before you paint. It draws the eye up and makes cheap cabinets look like expensive, custom-built millwork.
High-Impact Surfaces: Counters & Backsplashes
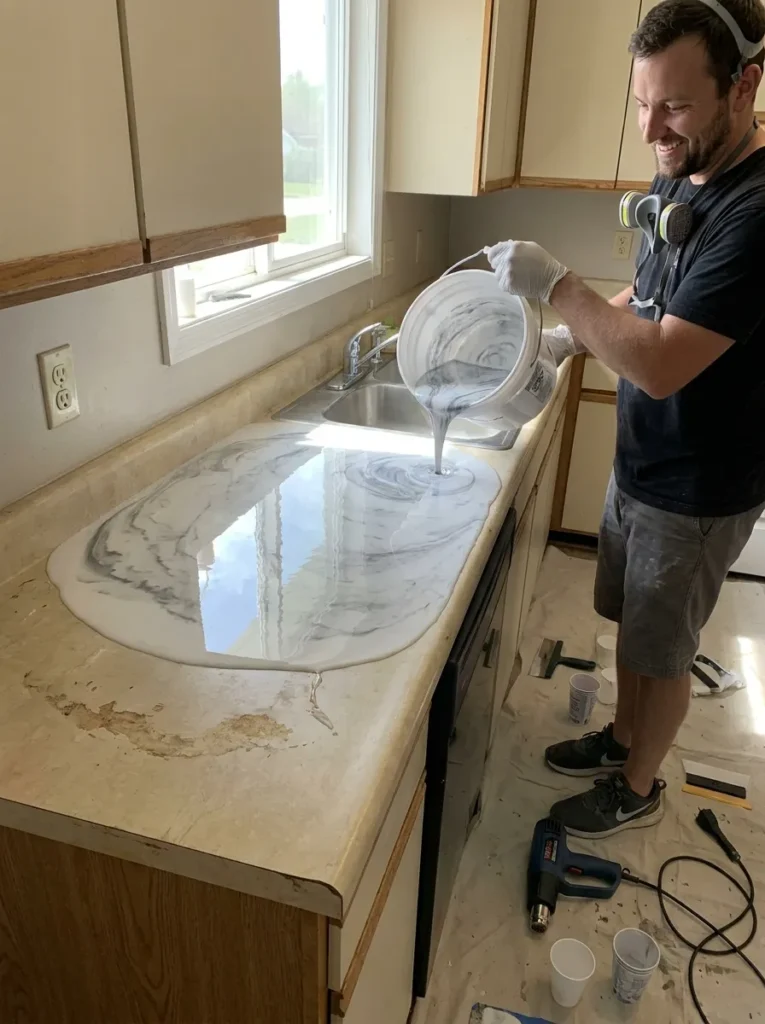
4. DIY Epoxy Countertops Before and After
You do not have to live with stained laminate. If you love a hands-on project, a DIY epoxy countertops before and after transformation is breathtaking. By carefully completing the resin pouring phase, blending in metallic or white pigments to mimic marble veins, and expertly fire-curing the surface with a torch to pop the bubbles, you create a rock-hard, high-gloss luxury surface for under $150.
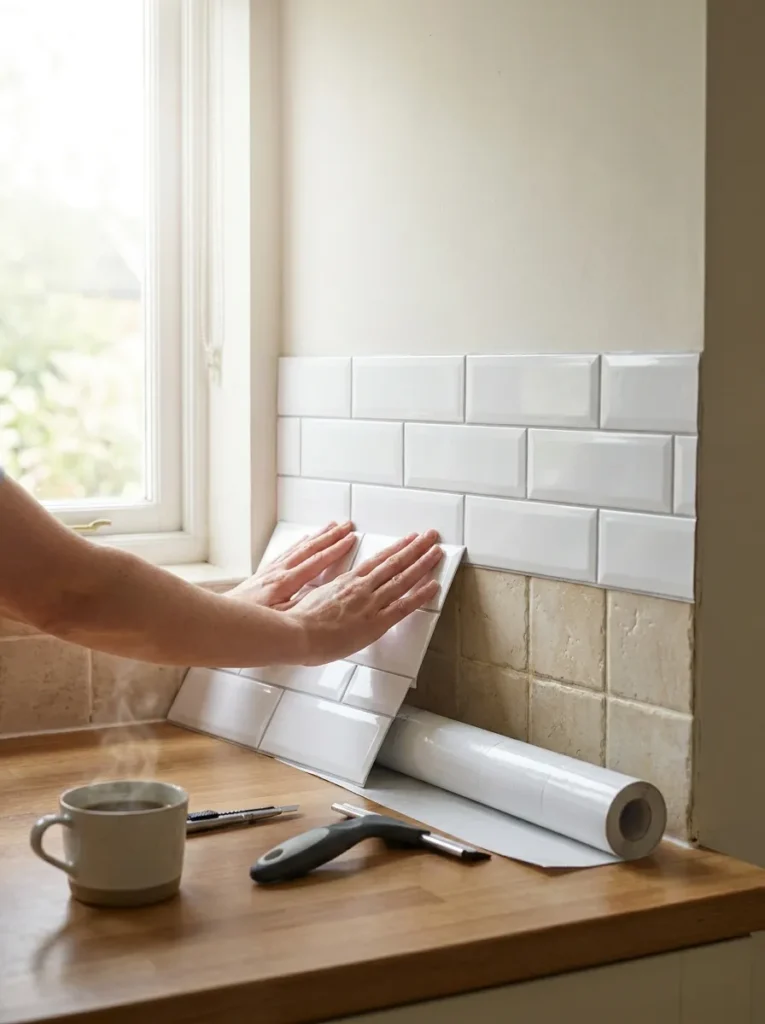
5. Peel and Stick Backsplash Kitchen Magic
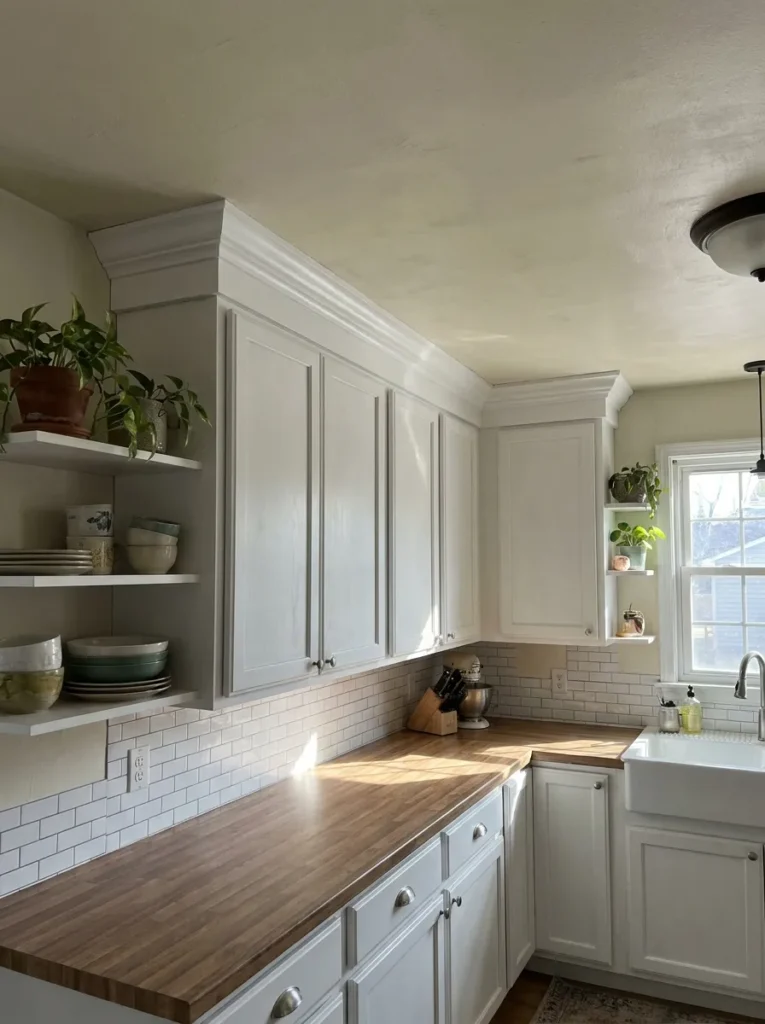
Ripping out old tile is messy and expensive. A peel and stick backsplash kitchen upgrade is the ultimate no-demo hack. Modern vinyl stick-on tiles look incredibly realistic. Apply a classic white subway tile pattern right over your ugly 90s fruit-motif backsplash to instantly clean up the visual lines of the room.
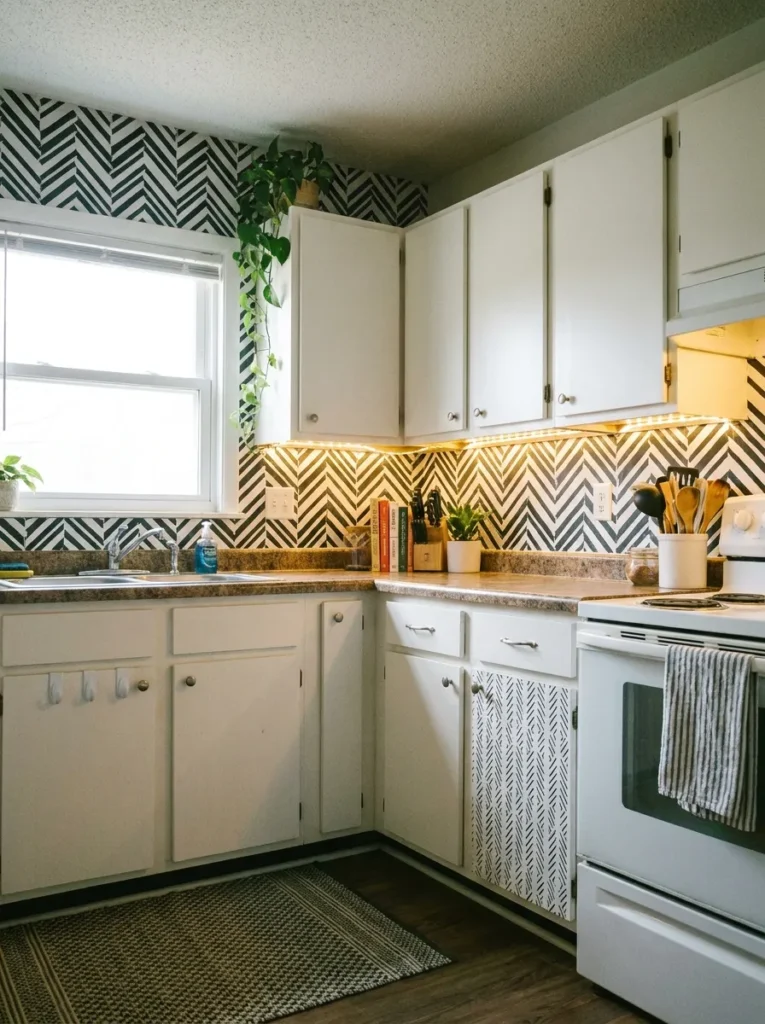
6. Geometric Renter Friendly Kitchen Upgrades
If you are renting and cannot paint the cabinets, use the backsplash to add massive personality. Bold, geometric renter friendly kitchen upgrades using removable tile decals completely shift the focal point of the room away from the boring cabinets and onto the striking pattern on the wall.
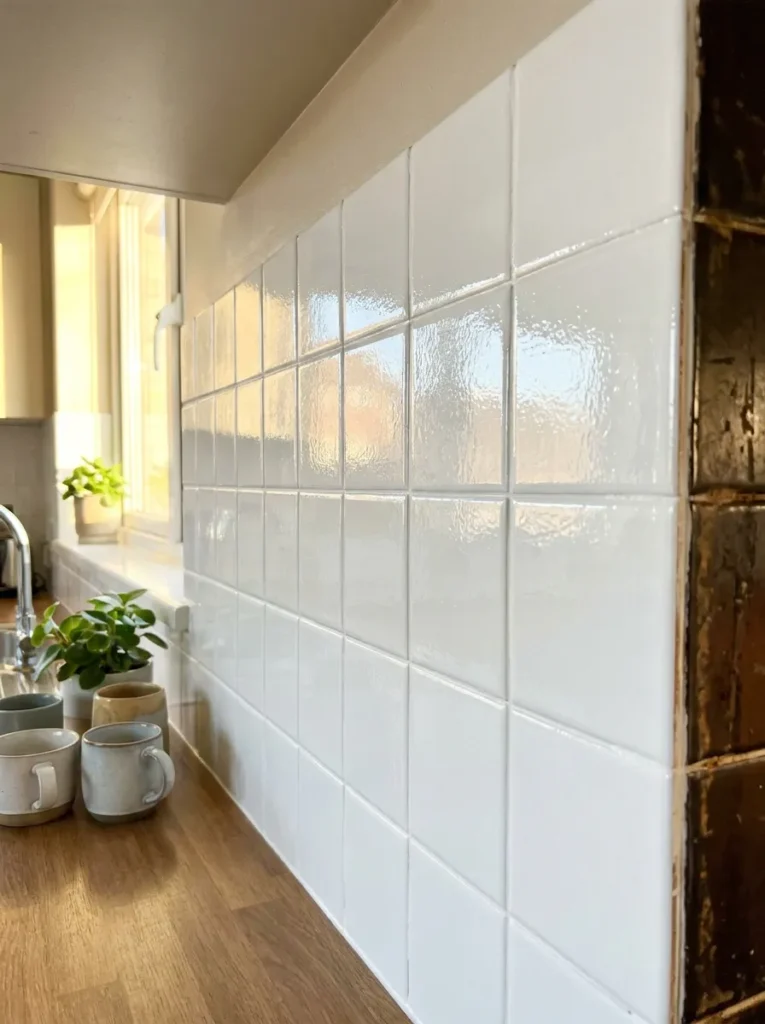
7. Paint Your Existing Ceramic Tile Backsplash
Did you know you can paint tile? If your backsplash has a great shape but a terrible color (like mustard yellow or dark brown), clean it heavily with a deglosser and use a specialized epoxy acrylic paint. It completely seals the tile in a fresh, bright white for under $40.
The Details: Hardware & Island Upgrades
8. Cheap Kitchen Hardware Update: Matte Black Pulls
Never underestimate the power of “kitchen jewelry.” A cheap kitchen hardware update takes less than an hour. Swap out your tarnished 1980s brass knobs for sleek, oversized matte black bar pulls. The sharp contrast against painted cabinets immediately makes the space feel contemporary.

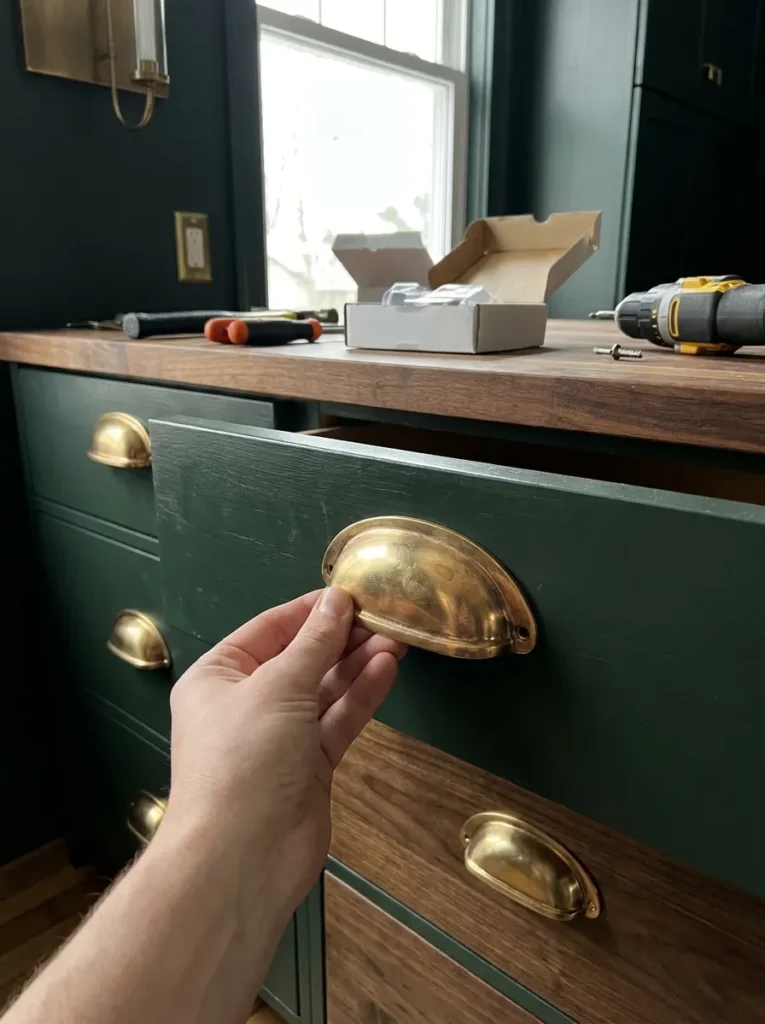
9. Vintage Unlacquered Brass Hardware
If you want a warmer, more historic look, replace your basic silver knobs with unlacquered brass cup pulls and knobs. The brass will naturally patina over time, giving your aesthetic budget kitchen makeover a rich, lived-in, and highly expensive English-cottage vibe.
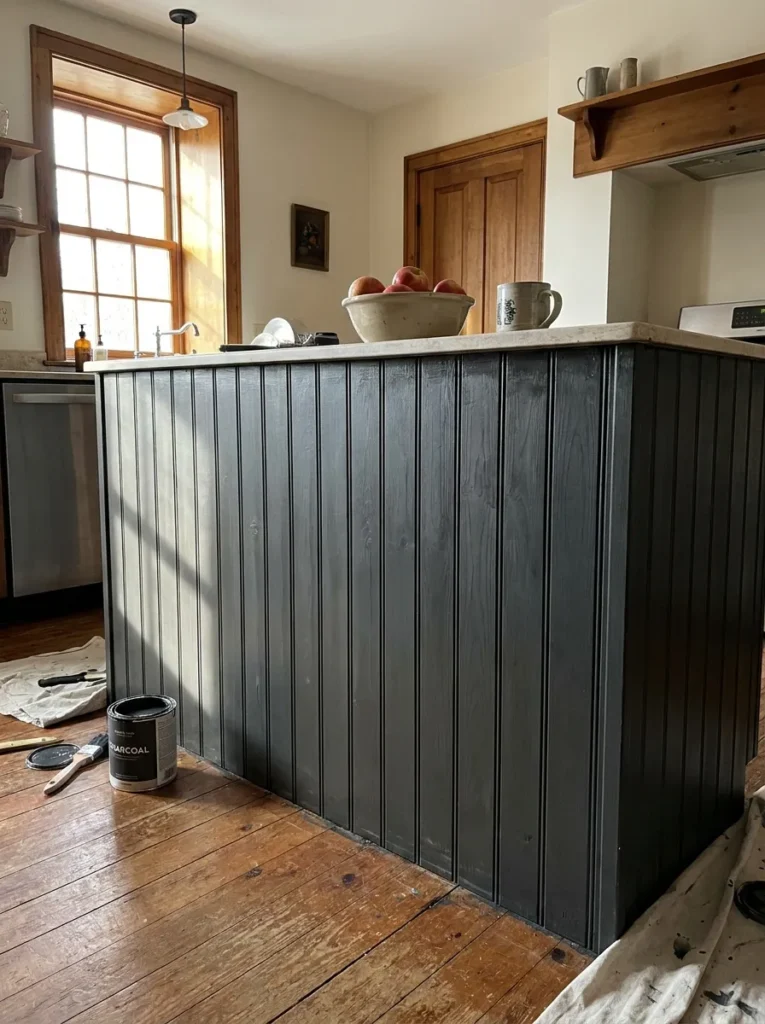
10. DIY Kitchen Island Makeover with Beadboard
A plain, flat-backed kitchen island looks incredibly generic. For a stunning DIY kitchen island makeover, buy a few sheets of cheap beadboard paneling or shiplap. Liquid-nail it to the back and sides of your island, add some baseboard trim, and paint it a bold accent color.
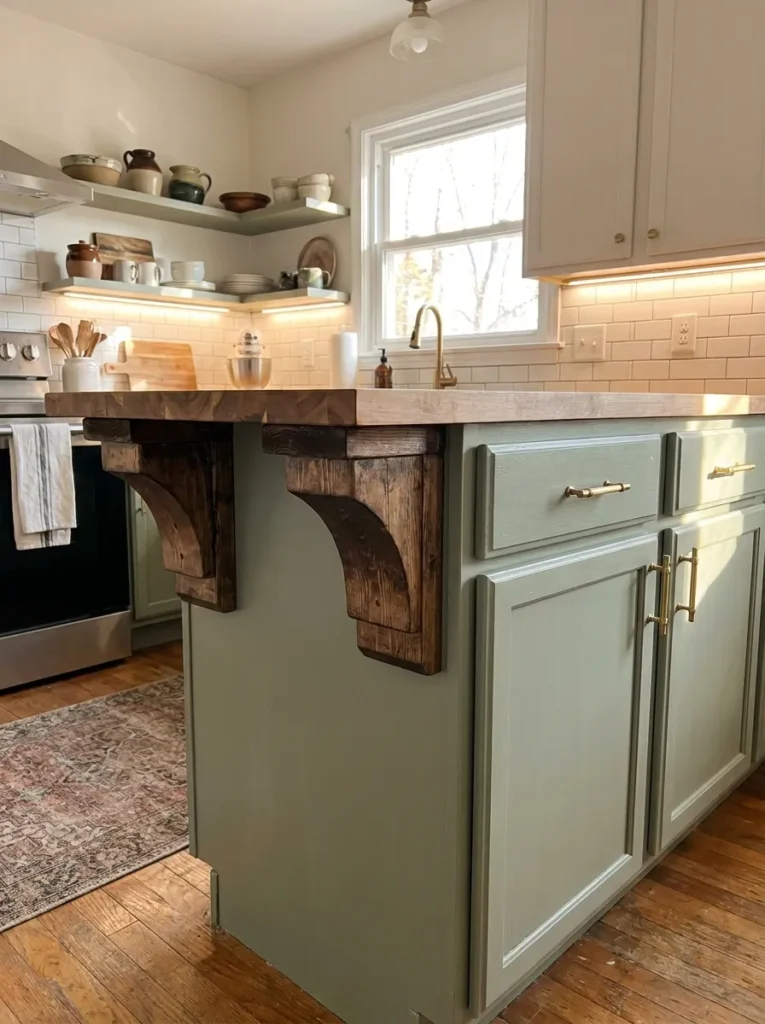
11. Add Farmhouse Corbels to the Island
To make your basic island look like a custom piece of furniture, buy two heavy wooden corbels (brackets) from the hardware store. Mount them under the countertop overhang on your island. It is an incredibly cheap architectural detail that adds massive character.
Lighting & Visual Expansion
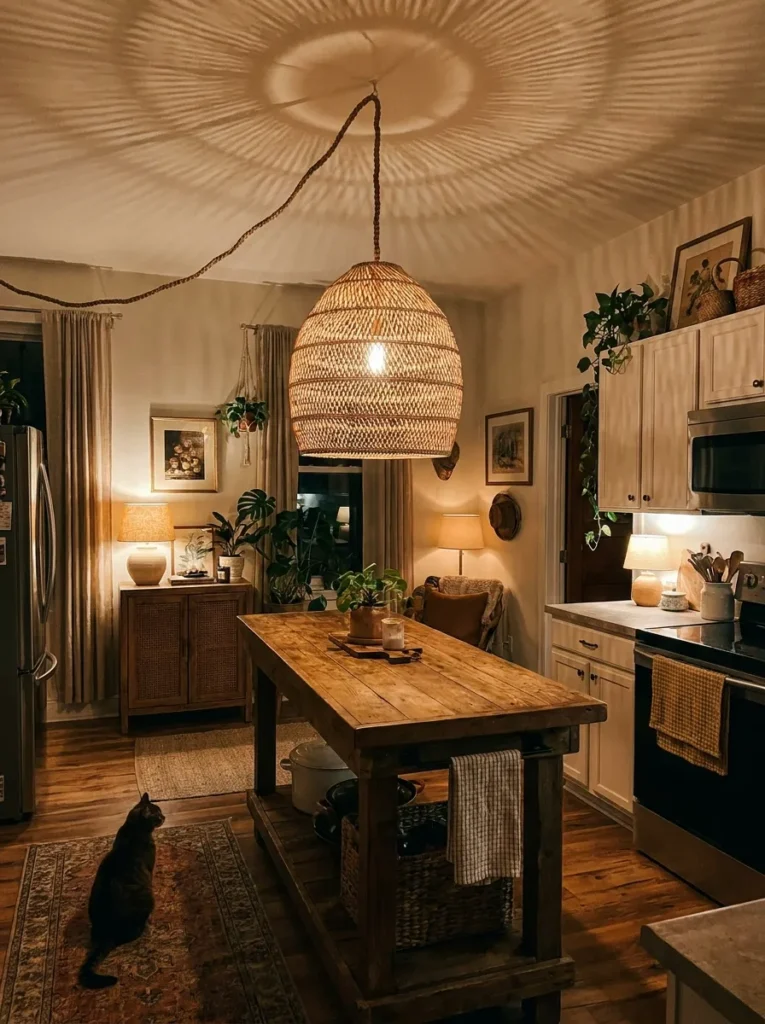
12. Swap the Boob Light for Statement Pendants
That generic, flush-mount glass dome light (affectionately known as the “boob light”) is killing your kitchen’s style. Turn off the breaker and swap it out for a large, woven rattan pendant or a sleek industrial metal dome. It completely changes the room’s lighting profile.
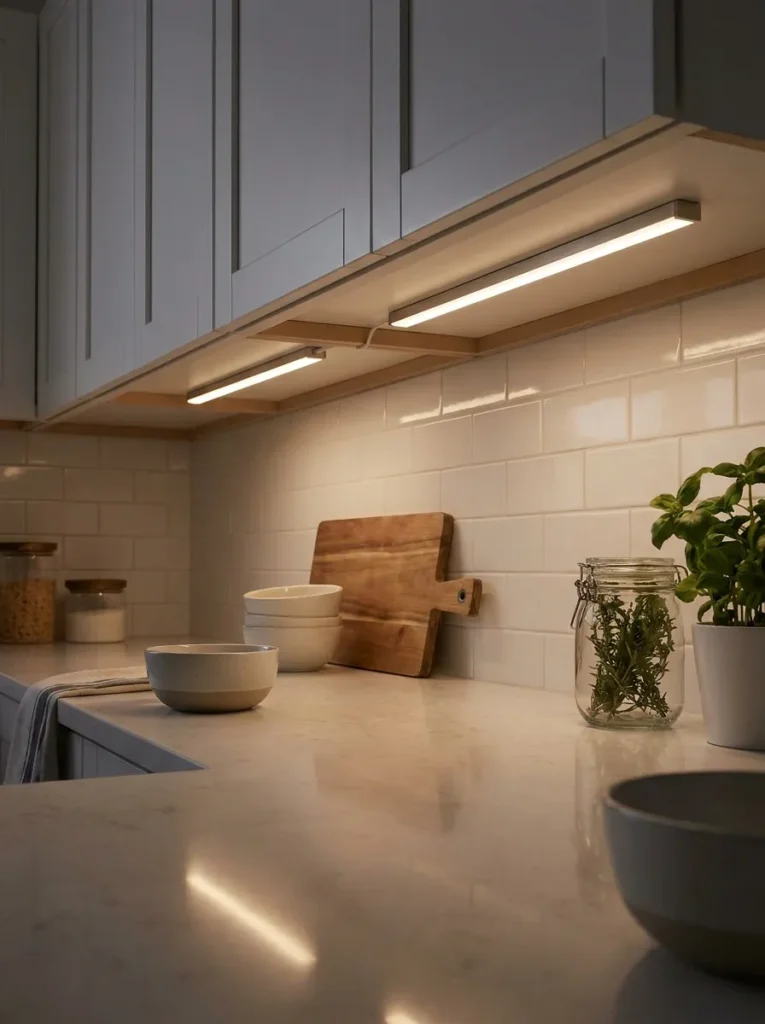
13. Wireless Under-Cabinet Lighting
Dark corners make a kitchen feel small. If you can’t afford an electrician to hardwire lighting, buy a pack of rechargeable, motion-sensor LED light bars ($25). Stick them under your upper cabinets to wash your new epoxy countertops in bright, high-end task lighting.
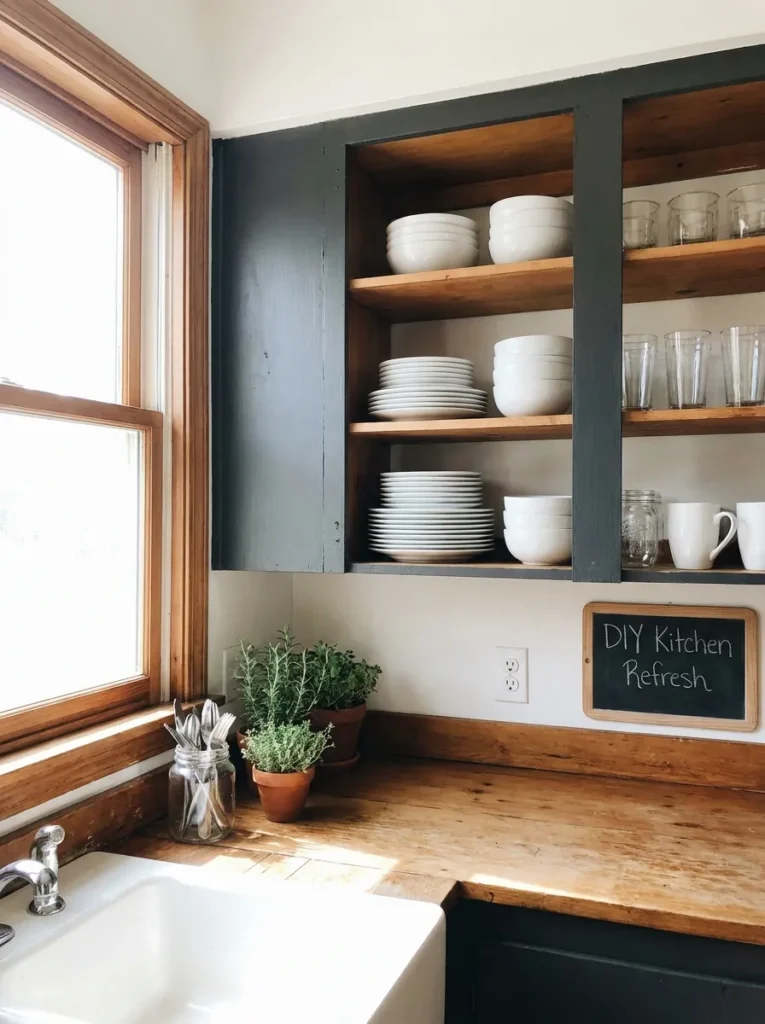
14. Remove Upper Doors for Open Shelving
If your kitchen feels like a claustrophobic box, take the doors completely off one or two of your upper cabinets. Paint the inside a contrasting color, and display your neatest stacks of white plates and clear glassware. It breaks up the heavy wall of wood and adds visual depth.
Floors & Styling: The Finishing Touches
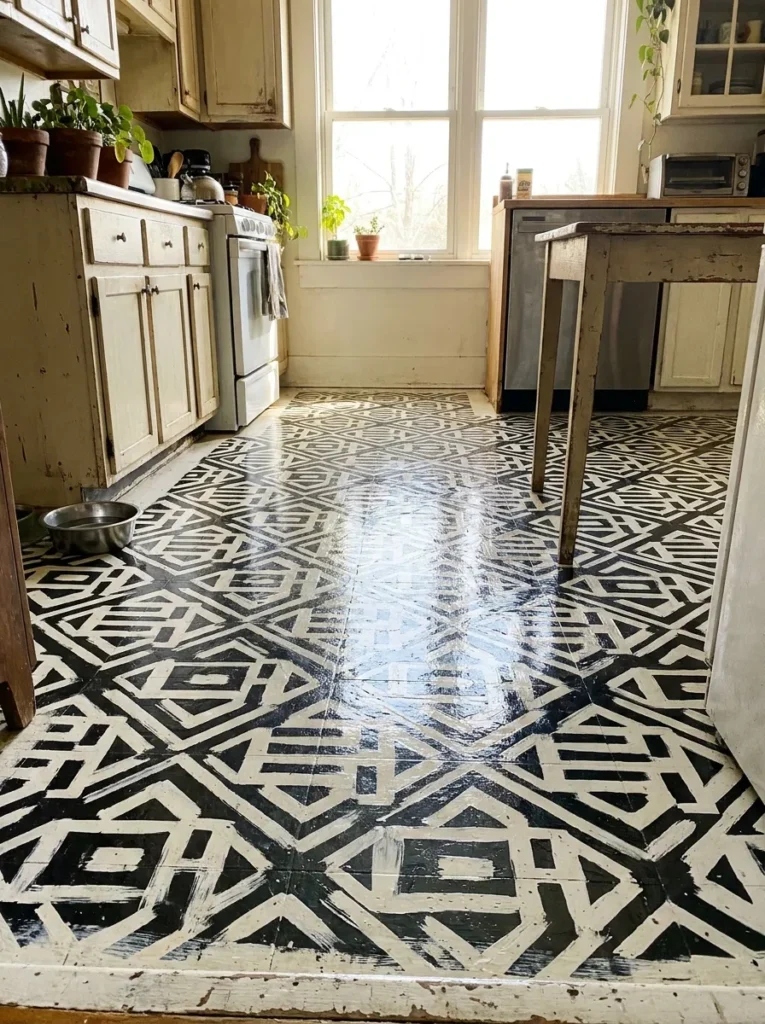
15. Stencil and Paint the Linoleum Floor
Ugly floor? Paint it! Thoroughly clean your old linoleum or ceramic tile, apply a bonding primer, and use a floor stencil to paint a gorgeous geometric or vintage lace pattern. Seal it with three coats of water-based polyurethane. It costs about $60 and looks like expensive cement tile.
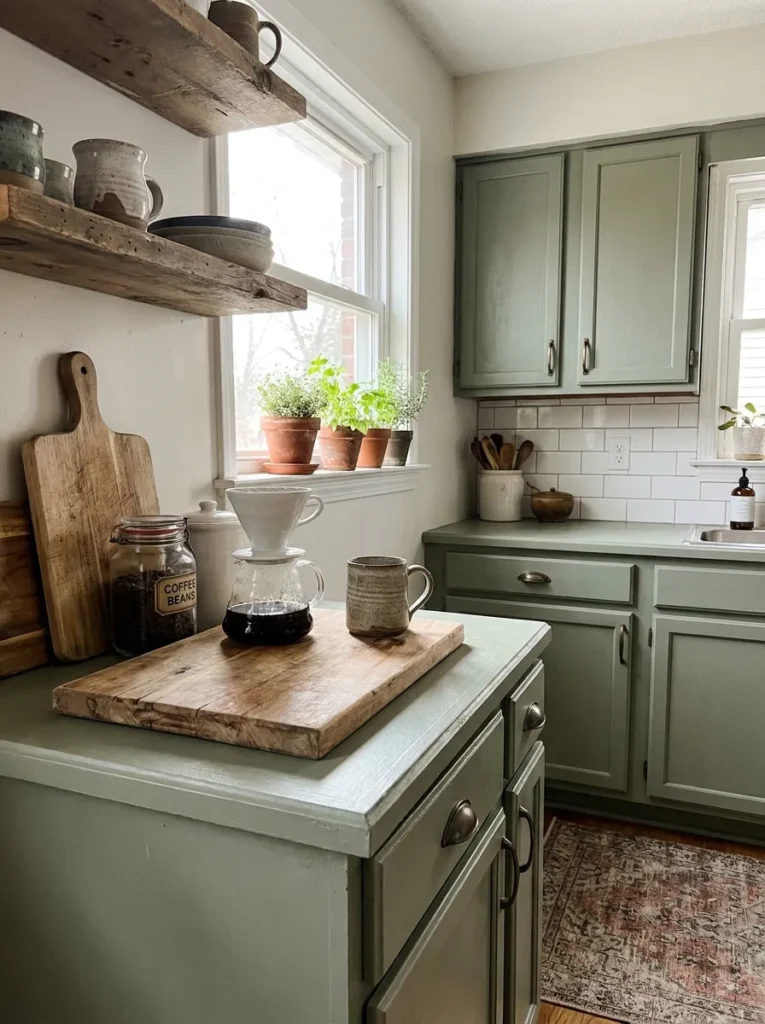
16. The Lo-Fi Coffee Station
An aesthetic budget kitchen makeover isn’t just about the walls; it is about how you style your daily routines. Clear a small corner of your counter and build a “lo-fi” coffee station. Use everyday household items—like a raw wooden cutting board as a tray, a vintage glass jar for coffee beans, and a simple ceramic pour-over. It makes the kitchen feel intentionally styled and deeply cozy.
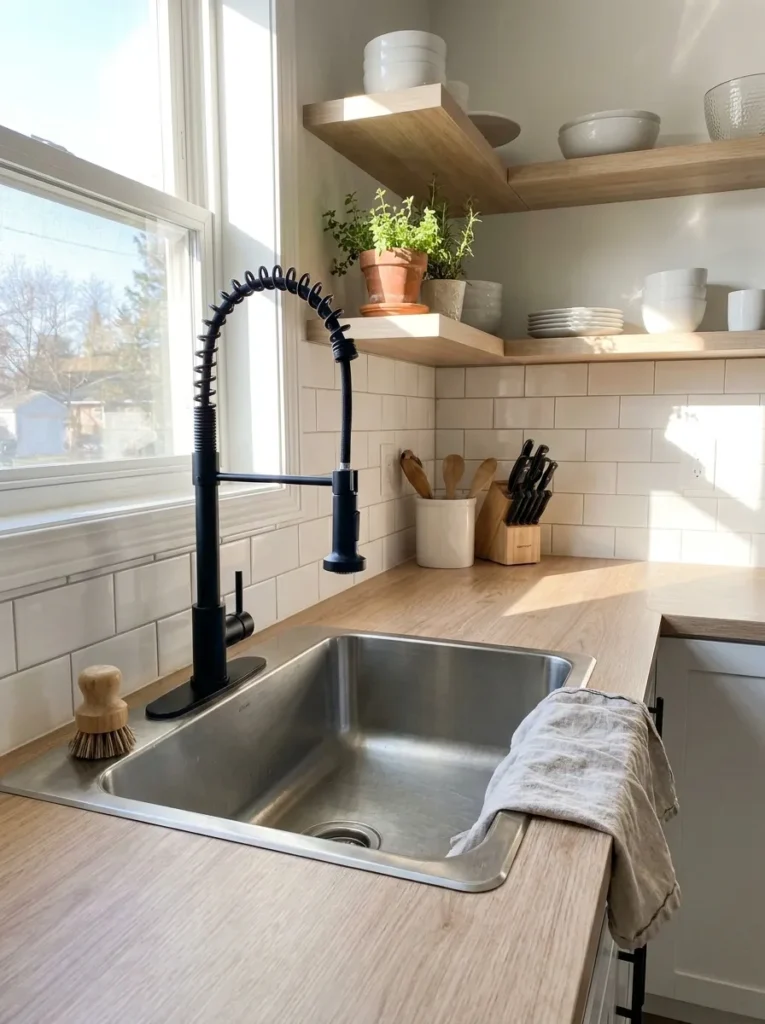
17. Replace the Faucet for Instant Luxury
A crusty, leaking chrome faucet makes washing dishes miserable. You can easily replace a kitchen faucet yourself with a wrench and a YouTube tutorial. A tall, commercial-style matte black or brushed gold pull-down faucet acts as the centerpiece of your sink area.
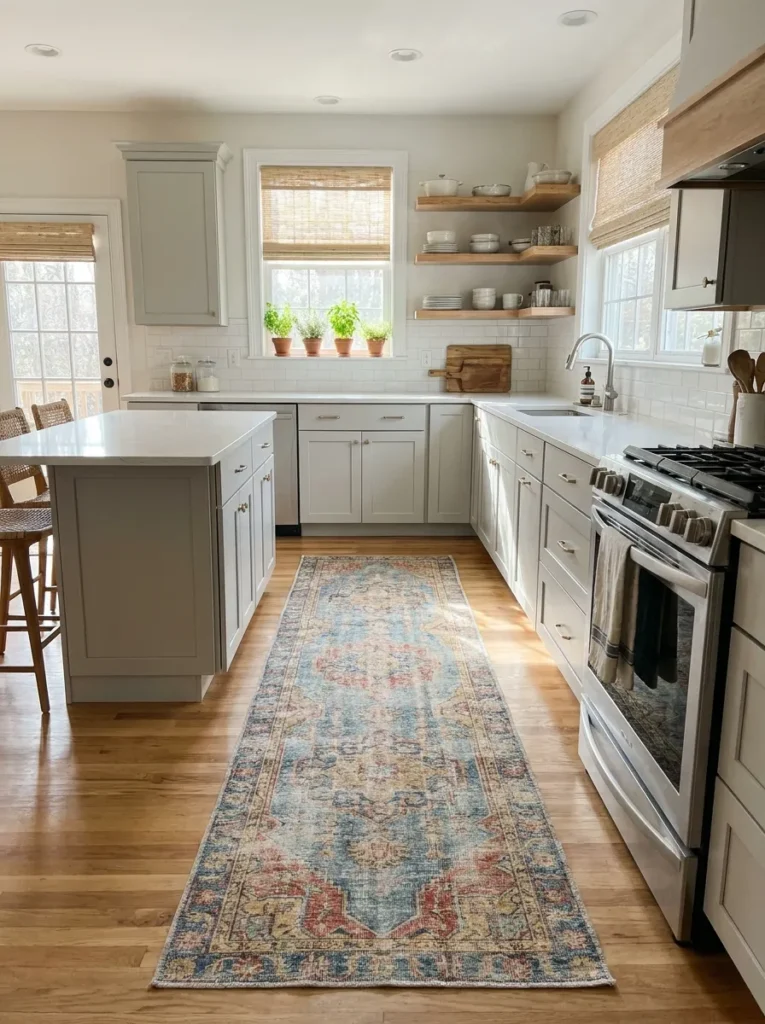
18. Ground the Space with a Vintage-Look Runner
The final step in your cheap kitchen makeover before and after journey is softening the hard lines. Throw down a long, washable, vintage-look runner rug in the aisle between your island and your sink. It covers up ugly flooring, adds a massive punch of color and pattern, and makes the room feel completely “finished.”
Shop the Makeover: Your No-Demo Project Checklist
Ready to trade your sweat equity for a kitchen you actually love? You do not need a demolition crew to make these massive changes. Here is your essential “no-demo” checklist to start your transformation this weekend:
- Cabinet Paint Kit: A heavy-duty, all-in-one cabinet paint and deglosser kit to banish the 90s oak.
- Cabinet Hardware: A bulk pack of sleek matte black bar pulls or unlacquered brass knobs.
- Epoxy Resin Kit: A high-quality countertop epoxy kit (don’t forget the mixing buckets and a small butane torch to fire-cure those bubbles!).
- Peel-and-Stick Tiles: Thick, realistic vinyl subway tiles to cover up your old backsplash in a single afternoon.
- Budget Pendant Lights: An oversized rattan or industrial metal pendant to finally replace that generic builder-grade ceiling light.
Stop waiting for a $20,000 miracle. Grab a paintbrush, order your epoxy, and start building your dream kitchen today!
Affiliate Disclosure: As an Amazon Associate, I earn from qualifying purchases. This means if you click on my links and make a purchase, I may receive a small commission at no extra cost to you. Thank you for supporting my content!